Using Simplify Commerce in a Ruby on Rails Application
Simplify Commerce makes setting up payments on your website really easy. In this tutorial, we are going to show you how you can integrate with Simplify Commerce in your Ruby on Rails application.
Create the sample Rails app
We are going to create a sample application for the purposes of this article:
$ rails new simplify-example
Once the Rails application is created, cd into the folder, and run:
$ bundle install
Add the Simplify Commerce gem to your Gemfile
The first thing we need to do is to use the Simplify Commerce gem in your rails app. Open your Gemfile, and add the following line:
gem 'simplify', '~> 1.1.2'
Run the bundle install command again. Once the command completes, the Simplify Commerce gem and its dependencies will be ready.
Get the API Keys
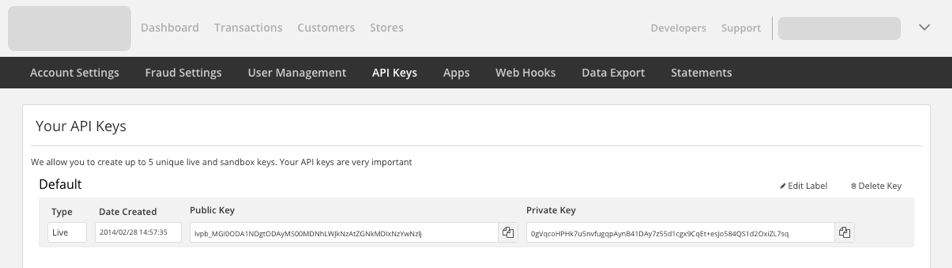
Next we need to get API keys from our Simplify Commerce account. Log into your Simplify Commerce account, and go to the Settings page. In the API Keys tab, you can find the default keys for your account. You can either use these, or create a new pair.
We are going to initialize the Simplify Commerce API with these keys. For the moment, we are going to set them up explicitly, but we’ll come back to this later.
Create a file under config/initializers called simplify.rb, and set your keys:
    Simplify::public_key = 'YOUR_PUBLIC_API_KEY'
    Simplify::private_key = 'YOUR_PRIVATE_API_KEY'
Change the values of the keys with your own. To first test your application, you’ll want to use Sandbox keys, starting with sbpb_. You will later change to Live keys (starting with lvpb_) which will make real payments.
Credit Card Form
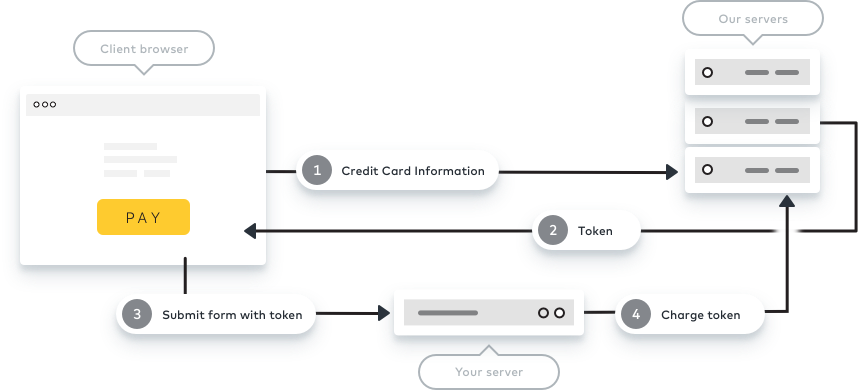
Now that Simplify Commerce is initialized with your API keys, we are going to build the credit card form. The credit card form will use the Simplify Commerce JavaScript library to first create a card token, which will then be used in the Rails application to submit the payment using the API.
The first thing to do is linking to the Simplify Commerce JavaScript library in your pages. This library depends on jquery, so make sure jquery-rails is present in your Gemfile. Open the layout for the payment page you are going to create (in this example it is app/views/layouts/application.html.erb), and add the javascript_include_tag below in the head of your page:
<%= stylesheet_link_tag    'application', media: 'all', 'data-turbolinks-track' => true %>

<%= javascript_include_tag 'application', 'data-turbolinks-track' => true %>

<%= javascript_include_tag 'https://www.simplify.com/commerce/v1/simplify.js' %>

<%= csrf_meta_tags %>
Next, we are going to create the view and the controller by using the controller Rails generator:
$ bundle exec rails g controller Payment index pay
This creates the PaymentController, along with two views, index which will display the credit card form, and pay, which will display the result of the payment. Let's open the index view in app/views/payment/index.html.erb, and add the following HTML:
<%= form_tag({controller: 'payment', action: 'pay'}, method: :post, id: 'simplify-payment-form') do %>

  <div>

    <%= label_tag('cc-number', 'Credit Card Number:') %>

    <%= text_field_tag('cc-number', nil, maxlength: 20, autocomplete: 'off', autofocus: true) %>

  </div>

  <div>

    <%= label_tag('cc-cvc', 'CVC:') %>

    <%= text_field_tag('cc-cvc', nil, maxlength: 4, autocomplete: 'off') %>

  </div>

  <div>

    <%= label_tag('cc-exp-month', 'Expiry Date:') %>

    <%= select_month(Date.new(Date.today.year, 1).beginning_of_month, {use_two_digit_numbers: true}, {id: 'cc-exp-month'}) %>

    <%= select_year(Date.today, {start_year: Date.today.year, end_year: Date.today.year+10}, {id: 'cc-exp-year'}) %>

  </div>

  <%= submit_tag('Process Payment', id: 'process-payment-btn') %>

<% end %>
To display the form, we need to need to start the Rails server:
$ bundle exec rails s
We can then display the page at the following URL: http://localhost:3000/payment/index.

You can add a bit of CSS later to make your form look awesome.
Now that we have the form ready, we need to add the JavaScript code needed to create the card token from the customer's card details — well, here we'll use CoffeeScript; if you prefer JavaScript, no problem, the code used here is an adaptation of the JavaScript code found in the tutorial. When we generated our controller earlier, the generator also created a CoffeeScript file, app/assets/javascripts/payment.js.coffee. Let’s open this file now, and view the following code:
    ready = ->
        $('#simplify-payment-form').on 'submit', ->
            $('#process-payment-btn').attr disabled: 'disabled'
            SimplifyCommerce.generateToken {
                key: 'YOUR_PUBLIC_API_KEY',
                card: {
                    number: $('#cc-number').val(),
                    cvc: $('#cc-cvc').val(),
                    expMonth: $('#cc-exp-month').val(),
                    expYear: $('#cc-exp-year').val().slice(-2)
                }
            }, simplifyResponseHandler
            false

    $(document).ready(ready)
Here, when the form is submitted, we disable the submit button, and we call Simplify Commerce’s generateToken function, passing the public key (that you need to set with your own) and the card details. When the call returns, the simplifyResponseHandler callback is called.
We now define the callback.
    simplifyResponseHandler = (data) ->
        paymentForm = $('#simplify-payment-form')
        $('.error').remove()
        if data.error
            if data.error.code == 'validation'
                errorList = ''
                for f in data.error.fieldErrors
                    errorList += "Field #{f.field} is invalid – #{f.message}"
                paymentForm.after errorList

            $('#process-payment-btn').removeAttr 'disabled'
        else
            token = data['id']
            paymentForm.append ""
            paymentForm.get(0).submit()
        return
We first clear errors that may potentially already be displayed, and we then check if the response comes back with errors. If it does, we retrieve validation errors, loop through them and display them in a div of class error. If the response is valid, we retrieve the card token, append it to the existing form with a hidden input field, and then submit the form.
Now that the client code is done, we need to process the form, including the card token, submitted from the client, and make the payment call to simplify.
Payment Controller: Process the Payment
To ensure the form is submitted as POST, we first need to update the pay route to use the POST method. Open config/routes.rb, and change:
get 'payment/pay'
to
post 'payment/pay'
Next open app/controllers/payment_controller.rb, and edit the pay method as follows:
     def pay
       payment = Simplify::Payment.create({
           amount: '1000',
           token: params['simplifyToken'],
           description: 'Simplify Rails Example',
           currency: 'USD'})

       @message = payment['paymentStatus']
     end
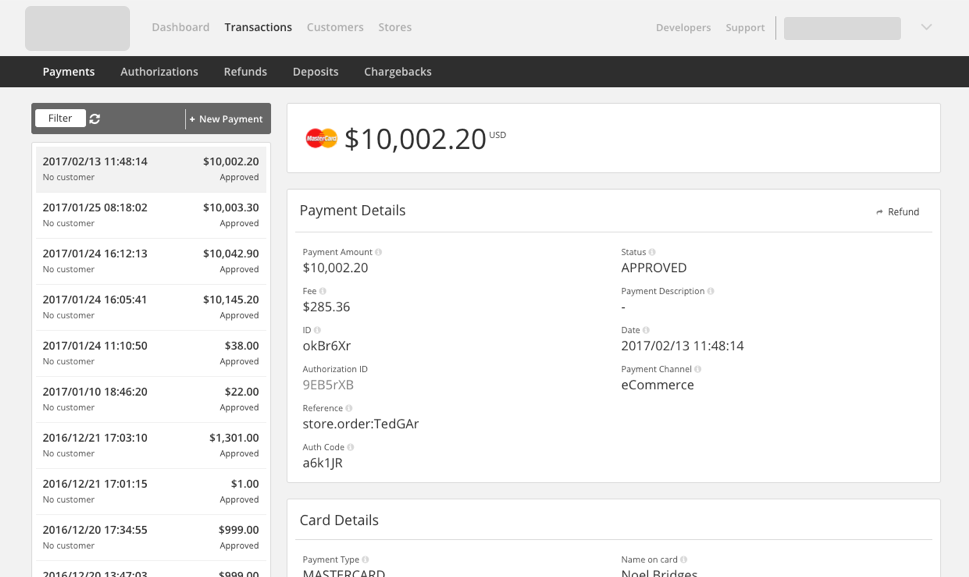
Here, we create a payment for $10 (the amount is set as 1000, the value in cents), passing the token created earlier. We then display the payment status from the response. Depending on the test card numbers you used, you will get either an APPROVED or DECLINED status. To ensure the payment was successful, you can check Payments in your dashboard; you should see all the transactions you have made there.
Protect your Keys
The last thing we are going to do is make sure our keys don’t go into the wild, and do not get added to source control, for example.
To do that, we are going to use the Figaro gem. Figaro allows you to define configuration values depending on the environment without exposing them. Add the following line to your Gemfile:
gem 'figaro'
and execute bundle install. Once the gem is downloaded, run the command:
$ bundle exec figaro install
at the root of your Rails app. This creates a new configuration file config/application.yml, and adds it to your .gitignore file, ensuring it will not be committed by accident into your git repository. Open config/application.yml, and set your keys as follows:
    simplify_public_key: "YOUR_PUBLIC_API_KEY"
    simplify_private_key: "YOUR_PRIVATE_API_KEY"
Then edit config/initializers/simplify.rb to use variables:
    Simplify::public_key = ENV['simplify_public_key']
    Simplify::private_key = ENV['simplify_private_key']
Restart your Rails app, and test.
The Next Steps
This is it! You can now accept payments in your Rails app! However, if you want to make this production-ready, there is a bit more work to do:
- Add some tests!
- Add some client-side validation on the form: you will probably want to ensure that the required fields are populated, and that the error messages are displayed if they are not;
- Make it look pretty with CSS;
- Proper error handling: we handled some validation for the token generation, but you’ll probably want to handle common issues like card declined, invalid tokens, invalid amounts, but also timeouts, etc.

